Your Ethernet cable is plugged in, the router is on, Wi-Fi works on your phone — but Windows just sits there showing a globe icon and the words “Not connected.” Frustrating doesn’t even begin to cover it. The good news is that Ethernet cable not working on Windows is almost always a software issue rather than a hardware failure, which means it’s fixable without buying anything new. This guide covers every real fix in a logical order — from the quick and obvious to the more thorough — so you can get your wired connection back without wasting time.
Why Is My Ethernet Cable Not Being Detected?
Before jumping into fixes, it’s worth knowing what’s actually going wrong. The most common culprits are a disabled network adapter, an outdated or corrupted Ethernet driver, incorrect IP or DNS settings, a corrupted TCP/IP stack, or a Windows update that broke something quietly in the background. Less often, the issue is physical — a damaged cable, a bad port on the router, or a faulty NIC (network interface card). Knowing this helps you work through the fixes in the right order instead of trying everything randomly.
Before You Start: Quick Physical Checks
Spend two minutes on these before touching any settings. They solve the problem more often than you’d expect.
Check that the Ethernet cable clicks firmly into both your PC’s port and the router or modem — it should snap in with a clear click. Look at the small LED lights on your PC’s Ethernet port: if they’re completely dark when the cable is connected, that points to either a dead cable, a dead port, or a disabled adapter. Try a different cable if you have one available. Try a different port on the router if there are multiple. Finally, connect that same cable to a different device — if it works there, the cable and router are fine and the problem is definitely on the Windows side.
Fix 1: Run the Network Troubleshooter
This is the least glamorous fix on the list, but it works surprisingly often and takes under a minute. Windows has a built-in diagnostic tool that catches common adapter and connectivity problems automatically.
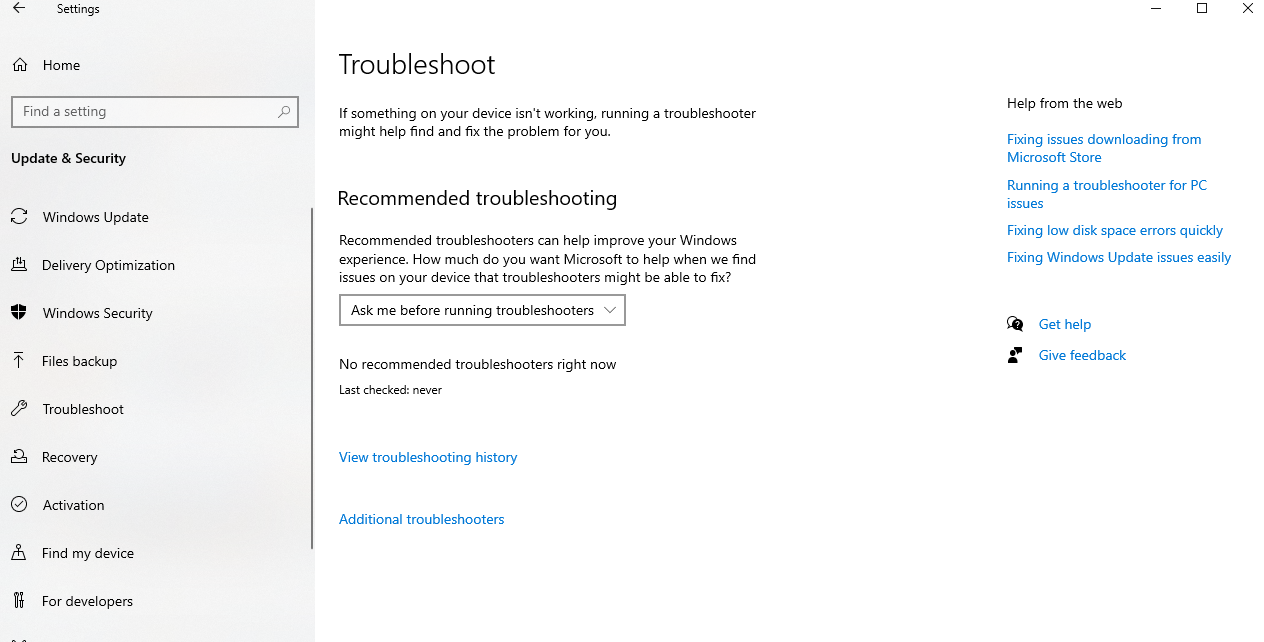
On Windows 11, go to Settings → System → Troubleshoot → Other troubleshooters, then click Run next to “Internet Connections.” Follow the prompts and let Windows attempt a fix. On Windows 10, go to Settings → Update & Security → Troubleshoot → Additional troubleshooters, then click “Internet Connections” and hit Run the troubleshooter. If it finds something and fixes it, restart your PC and check the connection.
Fix 2: Enable the Ethernet Adapter
This is one of the most commonly overlooked causes. A Windows update, a power management setting, or an accidental click can silently disable your Ethernet adapter, and Windows will show “Not connected” with no explanation. Here’s how to check:
- Press Windows + R, type
ncpa.cpl, and press Enter. This opens your Network Connections panel directly. - Look for your Ethernet adapter. If its icon is greyed out, it’s disabled.
- Right-click on it and select Enable.
- Wait a few seconds and check if the connection comes back.
If you don’t see an Ethernet adapter at all in this window, skip ahead to Fix 4 — the driver may be missing or the adapter may not be recognized by Windows.
Fix 3: Update or Reinstall the Ethernet Driver
A corrupted or outdated Ethernet driver is the single most common cause of “Ethernet not detected” on Windows 10 and 11, especially after a major Windows update. There are two approaches here: update first, and if that doesn’t work, do a clean reinstall.
Update the Driver
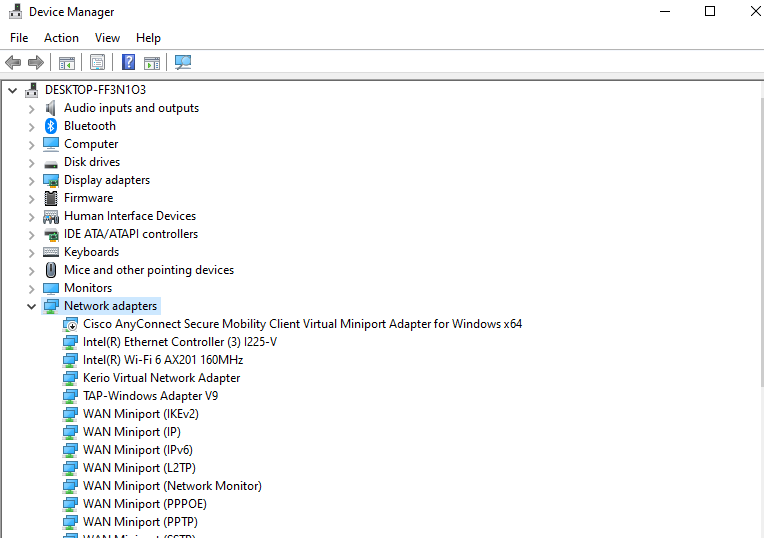
- Right-click the Start button and select Device Manager.
- Expand the Network adapters section.
- Right-click your Ethernet adapter (often labeled Realtek PCIe GbE, Intel Ethernet, or similar) and select Update driver.
- Choose Search automatically for drivers.
- If Windows finds an update, install it and restart.
Reinstall the Driver (Clean Install)
If updating doesn’t help, a clean reinstall usually does. In Device Manager, right-click your Ethernet adapter and select Uninstall device. Check the box that says “Delete the driver software for this device” if it appears. Click Uninstall. After that, go to Action → Scan for hardware changes — Windows will detect the adapter and reinstall the driver automatically. Restart your PC when it’s done.
If Windows can’t find the right driver on its own, go to your PC or motherboard manufacturer’s website (Asus, Dell, HP, Lenovo, MSI, etc.) and download the latest Ethernet driver for your specific model. Most of these are labeled with the chipset brand — Realtek and Intel are the two most common.
Fix 4: Reset the TCP/IP Stack and Flush DNS
Sometimes the issue isn’t the adapter or the driver — it’s the underlying network stack in Windows itself. This happens after failed updates, malware removal, or certain VPN installs. Resetting it takes about 30 seconds and fixes a surprising number of stubborn cases.
- Search for Command Prompt in the Start menu, right-click it, and select Run as administrator.
- Type each of these commands and press Enter after each one:
netsh int ip reset
netsh winsock reset
ipconfig /release
ipconfig /renew
ipconfig /flushdns
After running all five commands, restart your PC. Don’t skip the restart — some of these changes only take effect after a reboot. Check your Ethernet connection when Windows starts back up.
Fix 5: Check and Set IP Address to Automatic
If your Ethernet adapter is enabled and the driver is working but you’re still not getting internet, there’s a chance your IP address or DNS settings are manually set to incorrect values. Setting them back to automatic usually solves this quickly.
- Open Network Connections using
ncpa.cpl(press Win + R to open Run, then type it). - Right-click your Ethernet adapter and select Properties.
- Double-click Internet Protocol Version 4 (TCP/IPv4).
- Make sure both “Obtain an IP address automatically” and “Obtain DNS server address automatically” are selected.
- Click OK to save, then OK again to close Properties.
If you want to use a specific DNS for better performance (this is optional), Google’s DNS is 8.8.8.8 (primary) and 8.8.4.4 (secondary). Cloudflare’s is 1.1.1.1 primary and 1.0.0.1 secondary. Both are reliable and faster than most ISP-provided DNS servers.
Fix 6: Disable Power Management for the Ethernet Adapter
Windows has a feature that lets the operating system turn off hardware to save power — and your Ethernet adapter is one of the components that can get switched off this way. This is especially common on laptops and on desktop PCs with aggressive power plans.
- Open Device Manager and expand Network adapters.
- Right-click your Ethernet adapter and select Properties.
- Go to the Power Management tab.
- Uncheck the option that says “Allow the computer to turn off this device to save power.”
- Click OK and restart your PC.
This is a particularly useful fix if your Ethernet connection works fine after a restart but then drops after the computer has been sitting idle for a while.
Fix 7: Perform a Network Reset
If nothing above has worked, a full network reset is the next logical step. This removes all network adapters and resets every network-related setting back to Windows defaults — think of it as a clean slate specifically for networking. It’s the most thorough software fix short of reinstalling Windows.
On Windows 11: go to Settings → Network & Internet → Advanced network settings → Network reset. Click Reset now and confirm. Your PC will restart automatically.
On Windows 10: go to Settings → Network & Internet → Status → Network reset. Click Reset now and confirm.
One thing to note: after a network reset, any VPN software, virtual network adapters, or custom networking tools will need to be reinstalled. Windows will automatically reinstall your standard Ethernet and Wi-Fi adapters, but third-party network software won’t come back on its own.
Fix 8: Check Windows Services
A few Windows background services are required for your network adapter to function properly. If any of these are stopped or set to the wrong startup type, Ethernet can fail silently.
- Press Windows + R, type
services.msc, and hit Enter. - Look for the following services and make sure each one is set to Automatic and shows Running status:
The services to check: DHCP Client, DNS Client, Network Connections, Network Location Awareness, and Windows Event Log. If any of these are stopped, right-click them and select Start. If any show a startup type other than Automatic, right-click → Properties → change the Startup type to Automatic, click Apply, then Start.
Fix 9: Use System Restore
If your Ethernet connection was working fine and then suddenly stopped — especially after a Windows update or a software installation — System Restore can take your system back to a point when everything was working, without affecting your personal files.
Search for Create a restore point in the Start menu and open it. Click System Restore, then choose a restore point from before the problem started. Follow the prompts to complete the restore. Your PC will restart, and the network settings (along with the driver state at that point) will be exactly as they were.
When It’s a Hardware Problem
If you’ve made it through every fix above and Ethernet still isn’t working, the problem is likely physical. A dead Ethernet port on your motherboard or PC, a failed NIC, or a damaged cable that looks fine but has internal wire breaks can all cause this. The easiest way to confirm: plug the same cable into a different PC or laptop. If it works there, the problem is your PC’s hardware. If it doesn’t work there either, replace the cable.
If the port on your PC is confirmed dead, a USB-to-Ethernet adapter is a practical and inexpensive fix — you can get a reliable one for under $20 and it bypasses the onboard port entirely. Just plug it into any USB port and install the driver that comes with it.
Frequently Asked Questions
Why is my Ethernet cable plugged in but not working on Windows 11?
The most common reasons are a disabled network adapter, a corrupted or outdated Ethernet driver, or a corrupted TCP/IP stack. Start by checking if your adapter is enabled in Network Connections (ncpa.cpl), then update or reinstall the driver in Device Manager, and run the TCP/IP reset commands in Command Prompt as administrator.
How do I fix Ethernet not detected on Windows 10?
Open Device Manager and check the Network Adapters section — if your Ethernet adapter is missing or shows a yellow warning icon, right-click it and update or reinstall the driver. If the adapter isn’t listed at all, run “Scan for hardware changes” from the Action menu. Also run the built-in Network troubleshooter under Settings → Troubleshoot.
What do the commands netsh winsock reset and netsh int ip reset do?
These two commands reset the core networking components in Windows back to their default state. “netsh winsock reset” repairs the Windows Sockets API, which handles all network communication between programs and your network adapter. “netsh int ip reset” resets the TCP/IP stack, which controls how data is sent and received over your network connection. Both require a restart to take effect.
Can a Windows update break my Ethernet connection?
Yes, this happens occasionally. A Windows update can overwrite or corrupt network adapter drivers, change power management settings, or interfere with networking services. If your Ethernet stopped working shortly after an update, try rolling back the Ethernet driver in Device Manager (right-click the adapter → Properties → Driver tab → Roll Back Driver), or use System Restore to return to a point before the update.
My Ethernet works right after restarting but drops after a few minutes. What’s wrong?
This is almost always a power management issue. Windows is turning off your Ethernet adapter to save power. Go to Device Manager → Network Adapters → right-click your Ethernet adapter → Properties → Power Management tab → uncheck “Allow the computer to turn off this device to save power.” Restart your PC after making this change.
Will a network reset delete my files or Wi-Fi passwords?
A network reset does not delete personal files, documents, or photos. However, it does remove all saved Wi-Fi passwords and any VPN, proxy, or virtual network adapter software you’ve installed. After the reset, you’ll need to reconnect to Wi-Fi networks and reinstall any VPN clients or network virtualization tools you use.